Introduction
1.1 Purpose of this document
This document describes the installation and configuration of the HIN access gateway and the most important functions required for operational activities. We recommend that you use the checklist to prepare the installation.
1.2 Abbreviations
| Abbreviation | Definition |
|---|---|
| ACS | Access Control Service |
| AD | Active Directory |
| AGW | Access Gateway |
| DN | Distinguished Name |
| OU | Organisation Unit |
HIN Access Gateway
2.1 Overview
The HIN access gateway (AGW) enables access to HIN-protected applications without installing software, HIN certificates on workstations or a proxy. To this end, HIN federates with the institution's own active directory and maps active directory logins to HIN identities.
2.2 AGW registration
An institution uses an instance of the HIN access gateway. The AGW is registered during commissioning. During the registration process, the AGW transmits the organisation's external IP (or IP range) to the HIN data centre as well as the URL via which the AGW can be reached within the network.
2.3 Access to an HIN-protected site
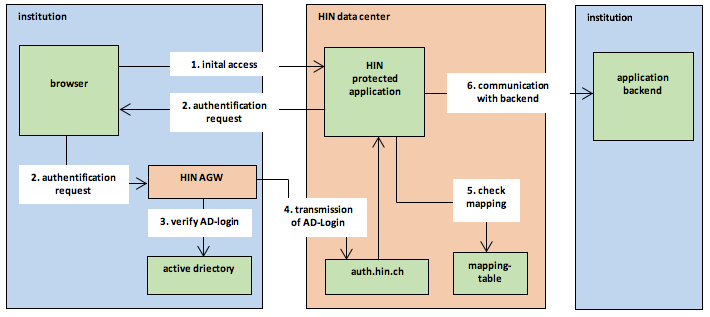
Figure 1: How the AGW operates
Users within the organisation can access a HIN-protected application directly from any browser without any mediation using AGW components. The HIN data centre uses the external IP of the query to determine whether this is from an organisation connected to the AGW. To authenticate the user, a query is sent to the organisation's own AGW via the user's browser. This is done using the URL transferred to HIN by the AGW during registration (see 0). The AGW identifies the registered active directory user and transfers him to the HIN data centre. HIN operates a central database that contains the link between the active directory login and the HIN identity. When a request is received from an active directory login that is stored in the database, the HIN identity is retrieved and reused. Single sign-on is thus complete.
2.4 The link between an AD login and an HIN identity
A central link table at HIN is required to enable requests from active directory logins to be assigned to the corresponding HIN identity. The owner of an HIN identity decides which active directory logins should be authorised to log on automatically under his identity. This can be managed under «Automatic login» at apps.hin.ch. To activate automatic login, users simply log on to the HIN platform using the mTan procedure. The user is then automatically recommended to use their own active directory account in conjunction with the HIN identity that they have just used.
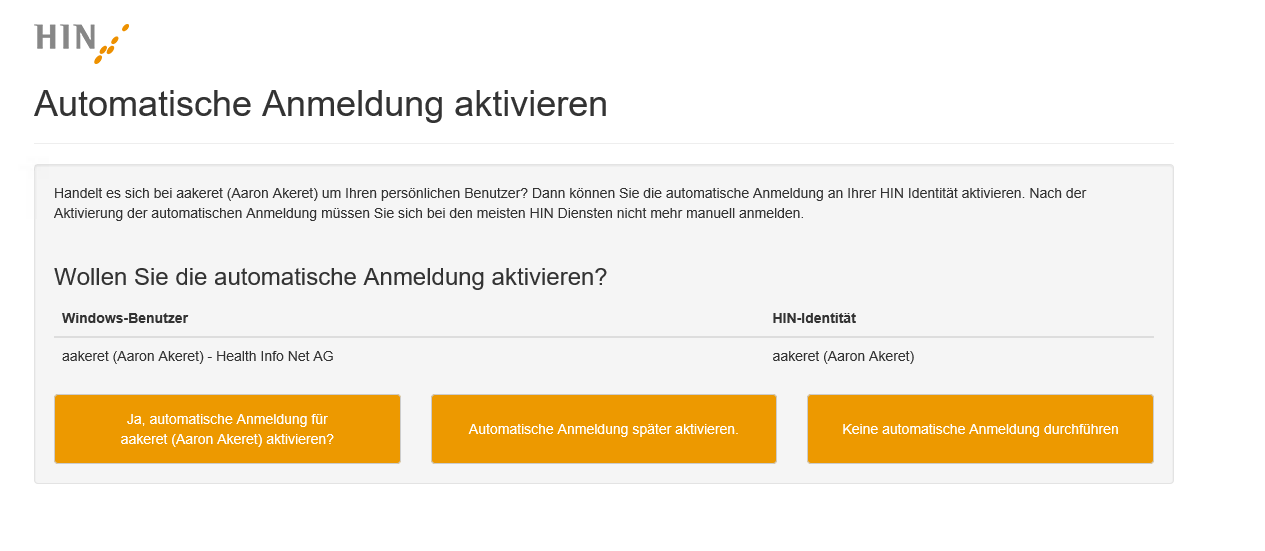
Figure 2: Activating automatic login
„Ja, automatische Anmeldung für aakeret (Aaron Akeret) aktivieren" - With this option, the Windows account is linked to the HIN ID of the user. The next time he logs in, he will be automatically logged in with his own HIN ID.
„Automatische Anmeldung später aktivieren" - With this selection, the Windows account will not be linked to the HIN ID, but the user will be prompted for the selection each time.
"Do not perform automatic login" - If the user selects this option, the dialog will no longer be displayed. If***„Keine automatische Anmeldung durchführen"*** the user wants to activate the link at a later time, he must make the change at https://apps.hin.ch.
2.5 Trust level concept
Providers of HIN-protected web applications (ACS/FS) can choose between three trust levels. The AGW enables authentication at all three trust levels:
| Trust level | Authentication | Description | Information from the application provider's perspective |
|---|---|---|---|
| 1 | User authentication in the institutional active directory. | The user is known and authenticated within the institution. | The application provider receives information on which organisation is accessing the application, but not which specific person. |
| 2 | User authentication in the institutional active directory. | Same as for trust level 1, plus: The user has a HIN identity and has linked this to the active directory user. | The application provider receives information about the specific person who is accessing the application. However, the person has not been strongly authenticated. |
| 3 | Strong authentication (Two-factor authentication) | Same as for trust level 2, plus: The user's HIN identity has been strongly authenticated. | The application provider receives information about the specific person who is accessing the application and knows that he has been strongly authenticated. |
As soon as the AGW has been installed, all users in the organisation may use trust level 1 applications. If an application requires a higher trust level, a step-up process is initiated. This can look something like the following example:
The active directory user john.smith (John Smith) has linked his HIN identity jsmith1. This enables him to access trust level 2 applications without any additional measures. However, John Smith now accesses an application that requires trust level 3. John Smith needs a second authentication factor to access trust level 3. The HIN platform therefore sends him an SMS (see 2.6). After completing the mTAN procedure, John Smith is authenticated at trust level 3 for this session and can access the application.
2.6 Second factor for trust level 3 applications
In principle, there are two ways of providing the second factor for trust level 3 applications:
-
The second factor is provided by the HIN platform
-
The AGW institution provides the second factor when logging onto the active directory.
In the case of the second option, it is specified in the contract that the organisation has already undertaken strong authentication. Requests from the relevant AGW are then automatically treated as strongly authenticated.
2.7 Identity reference/packages
At trust level 2 and above, personal HIN identities are required. These can be obtained in packages from HIN. Registration is via an online login form, on which the user must enter, his protected HIN mail gateway address as well as other information. Having completed the form, the user is identified using video identification and the identity is entered by HIN. The user is then sent an e-mail to his protected address., This e-mail contains his initialisation data and explains the subsequent procedure.
2.8 System administration
The web GUI is used for system administration. The support connection is available for support cases. This must be activated via the web GUI.
Commissioning
3.1 Overview
The HIN access gateway is supplied as a preconfigured virtual appliance. The following virtualisation environments are supported:
-
VMWare (ESX, workstation, player)
-
Microsoft Hyper-V
The HIN access gateway is configured using a web GUI. The commissioning procedure is as follows:
-
Preparation for commissioning
-
Importing of the virtual appliance
-
Integration into the company network
-
Configuration of the HIN access gateway
-
Configuration of the browser
-
Activation with HIN
3.2 Verifying the AGW image checksum
In order to ensure the integrity of your AGW, you can test the checksum for the image prior to installing the AGW. You can find the checksum on the download page www.hin.ch/agw-download. You can do this with the following command in PowerShell:
get-filehash -path C:\Users\ihruser\Downloads\hin-access-gateway-vmware.zip -Algorithm SHA256

Figure 3: Verifying of the AGW-Image
3.3 Preparation for commissioning
We recommend collecting all the necessary information prior to commissioning. The following information is required:
| Item | Description |
|---|---|
| External IP/ IP range | Requests from the AGW organisation are identified on the basis of the source IP. |
| IP address(es) | Internal IP address(es) for the AGW instance(s) |
| Subnet mask | Subnet mask of the selected network |
| Default gateway | Default gateway via which devices access the Internet |
| Virtual IP address | Only required for cluster operation: Each virtual IP is assigned to the active cluster node (see 4.9). |
| Host name | Host name(s) |
| DNS server | DNS server for name resolution |
| Domain controller | The AGW checks the active directory for the registered AD login. |
| A record | End users must be able to access the AGW from their browsers. An A record is required for this purpose. The A record need only exist within the network. It should not be possible to cancel it externally. |
| Certificate | A valid certificate (matching the aforementioned A record) is required for operating the AGW. This can originate from an internal certification authority (CA), for example, and must be accepted by end users' browsers. |
3.3.1 Creating an A record / Requesting a certificate
The AGW must be accessible from end users' browsers. An A record is required for this purpose. The associated SSL certificate must be stored on the AGW so that the browsers of end users classify the connection as secure. The certificate can originate from an internal CA.
3.3.2 Activating ports
The following ports are required for operating the AGW:
| Port | Source | Destination | Description |
|---|---|---|---|
| Basic functionalities | |||
| TCP 443 (https) | HIN Access Gateway(s) | gateway.hin.ch / app.hin.ch / auth.hin.ch / agw-manager.hin.ch | Connection to the HIN datacentre for application access. |
| TCP 443 (https) | Clients (end users) | HIN Access Gateway(s) | Access to the access gateway for authentication |
| TCP 389 (ldap) | HIN Access Gateway(s) | Active Directory | Verification of the AD login |
| TCP 636 (ldaps) | HIN Access Gateway(s) | Active Directory | Verification of the AD login |
| TCP 88 | HIN Access Gateway(s) | Active Directory | Verification of the Kerberos token |
| UDP/TCP 464 | HIN Access Gateway(s) | Active Directory | Kerberos for AGW AD Join |
| TCP 2222 (ssh) | HIN Access Gateway(s) | update2.agw.hin.ch | Connection to the HIN datacentre for the support connection |
| TCP 80 (http) | HIN Access Gateway(s) | update2.agw.hin.ch | Obtaining system updates |
| TCP 4433 | Admin clients | HIN Access Gateway(s) | HIN AGW Admin port |
| Cluster (Required if the AGW is being run in a cluster) | |||
| TCP 22 (ssh) | Between all cluster nodes | Required for synchronising the cluster settings | |
| UDP 5404-5406 | Between all cluster nodes | Required for switching virtual IP address |
3.3.3 Settings for video identification
Settings for video identification
Video identification can be done via mobile phone and app or on the computer using Chrome or Firefox. If the identification takes place via the computer, please check whether the test link works:
Video Ident Quality Test: https://video.online-ident.ch/call-quality-check
If not, check if microphone and camera access is allowed for the following URLs.
-
https://go.online-ident.ch/*
-
https://api.online-ident.ch/*
-
https://hin.ch/*
-
wss://api.online-ident.ch/*
If it still does not work, enable the following on the firewall:
IPs:
193.169.187.169
193.169.187.170
185.85.230.50
185.85.230.51
Ports:
TCP 443
UDP 3478
UDP range 6000-7000
3.4 Integration into the company network
For the VM, we recommend 5 GB of hard drive space, 2 GB RAM, and 1 CPU. After importing the VM image, the network settings can be adjusted on the console admin account

Figure 4: Network configuration via the console

Figure 5: The URL for the web interface
The access gateway can now be accessed via the configured IP address https://[AGW IP]:4433.
the access gateway can now be configured via the web interface (see 0).
3.5 Activation of the HIN access gateway
The access gateway is activated together with HIN. Please complete access gateway and browser configuration before activation. A joint activation date is agreed with a HIN employee.
Configuration of the HIN access gateway
4.1 Overview
The following table describes the roles of the various tabs for configuring the web interface:
| Tab | Description |
|---|---|
| Status | Overview of the current status of the appliance |
| System Config | Basic configuration: Network, monitoring, AD server |
| SSL | Configuration of the SSL certificate of the AGW |
| AGW registration | Registration and configuration of the AGW 2.0 functionality |
| Classic Proxy | Configuration of the proxy functionality from AGW 1.5 |
| Administration | Software updates, support connection and backup |
| Cluster | Cluster configuration |
| Logs | Overview and consultation of log files |
| Setting the password | Changing the password of users who are logged on |
| User | User management |
Login
4.2.1 Initial access to the access gateway
When calling up the access gateway, you will be requested to enter the
login details for the admin user created in the console. We also
recommend that you create a personal admin account for each
administrator in the «Users»
tab.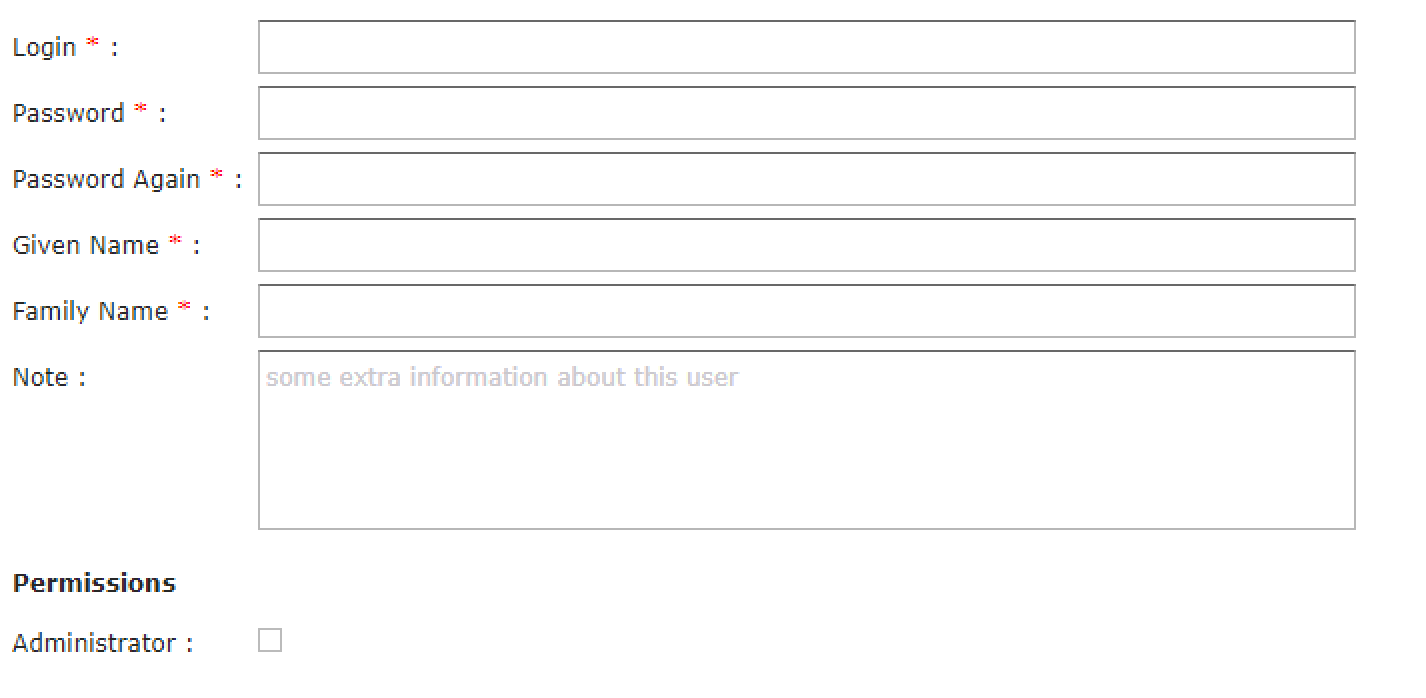
Figure 5: Creating the initial user admin
The «Create admin account» button is used to configure the account on the access gateway. Please ensure that the «Administrator» box is activated. You will then be taken to a login screen, where you can log on as the user you have just created.
4.2.2 Changing password
You can change your password on the «Set password» tab.
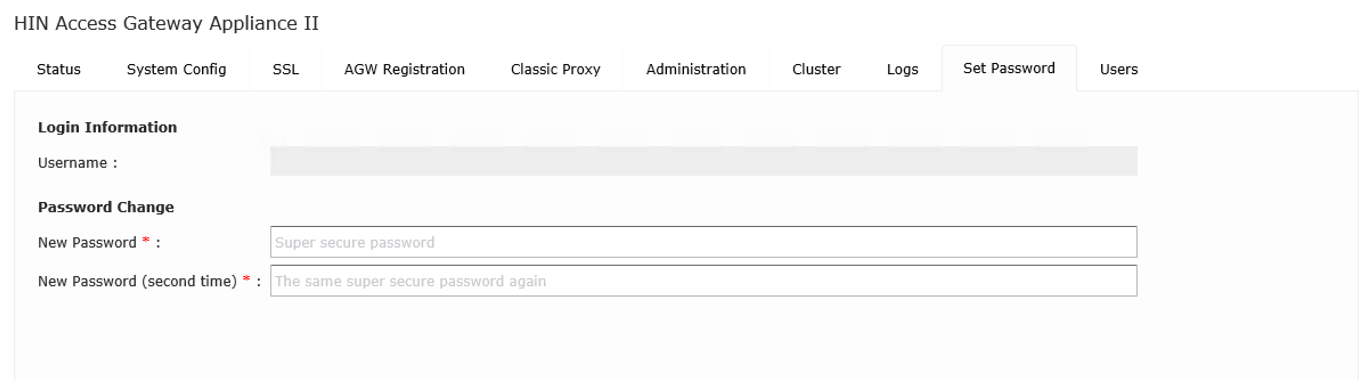
Figure 6: Changing password
4.3 Status
All system-relevant data for the access gateway is shown on the «Status» tab.
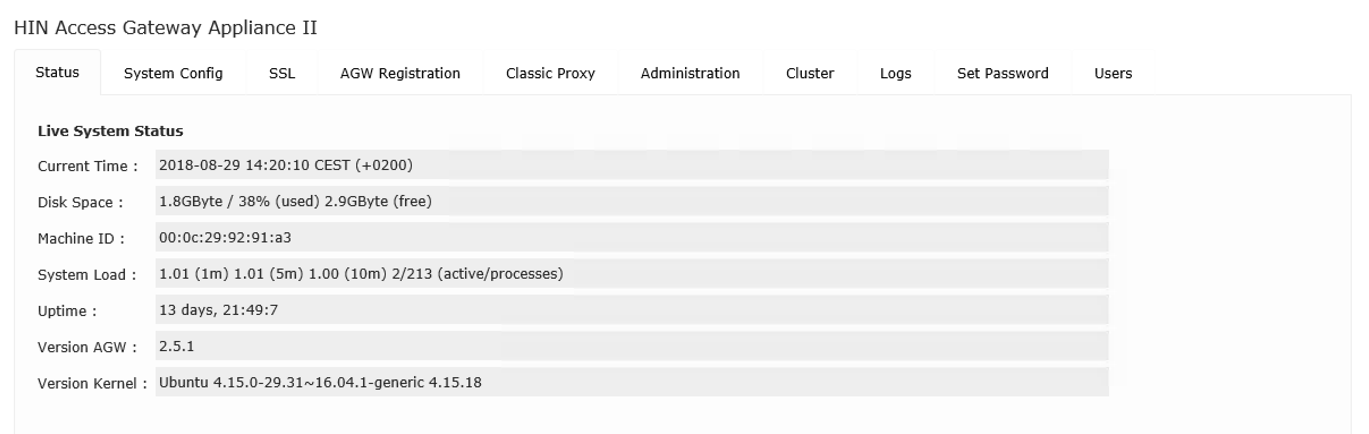
Figure 7: Status overview
4.4 System configuration
Settings like network addresses, time servers, monitoring and notification can be configured on the «System config» tab.
4.4.1 Network configuration
The fields marked with a red asterisk are mandatory.
4.4.2 Time
Specify your time zone and two NTP servers. This setting is usually irrelevant because the AGW is a virtual machine and therefore takes the time of the host server. If synchronisation with the host is prevented or inhibited by the VM tools, the time servers specified here are accessed.
4.4.3 Active Directory Access
The servers which are queried for validating active directory logins are defined under active directory. Please note: At present, only one domain controller and its fallback can be defined. Multiple instances are not currently supported.
4.4.4 Upstream Proxy
If the AGW needs to be connected externally via a proxy, it must be entered here.
4.4.5 Group Mapping
AD Groups
The «Distinguished Name» (DN) f an AD group is displayed in the active directory under «Attributes». To see this, «Advanced view» must be selected under «View» . Then, the «Distinguished Name» can be viewed under «Properties» > «Attribute Editor». Double click the DN to copy it to the clipboard.
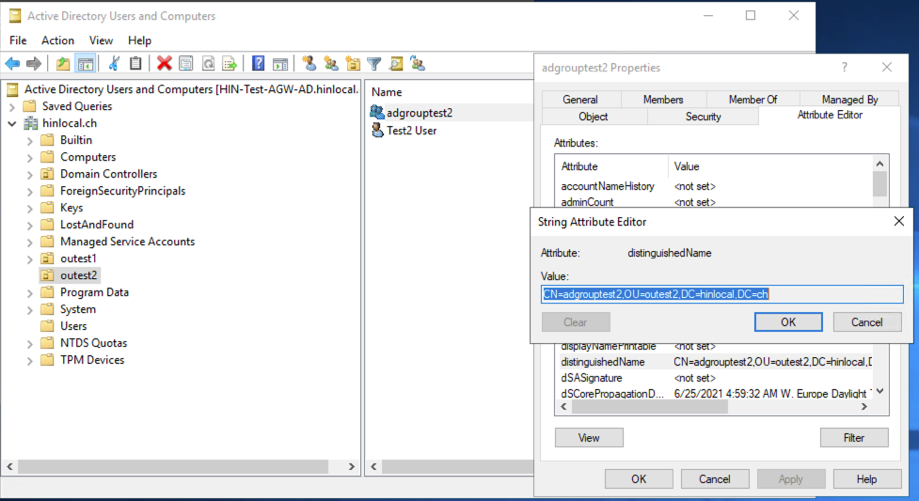
Figure 8: Distinguished Name im Active Directory
In the AGW under «System Config», give the group a name of your choice followed by a colon and space (e.g. «mygroup1: ». Then enter the DN. One entry can be made per line. The name set for the group must then be shared with HIN.
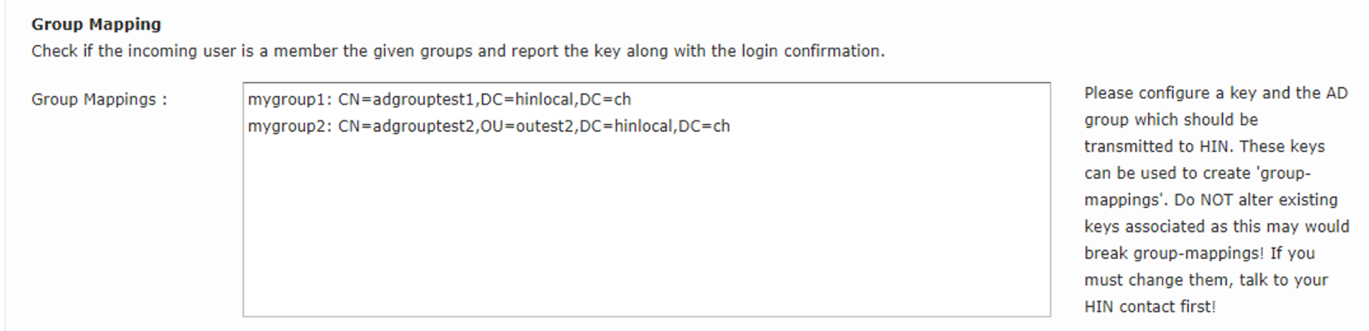
Figure 9: AD Group Mapping
Organizational unit (OU)
To store OUs, you will need the full «Distinguished Name». However, this does not necessarily need to be entered in the AGW.
Please contact HIN to store the corresponding HIN IDs. If a user belongs to multiple defined groups, use the first group that was stored in HIN. Permissions are not inherited by HIN IDs mapped to AD accounts.
Monitoring
The public SNMP community string can be used to retrieve standard MIBs from Ubuntu. The syslog option sends log information to a syslog server.
4.4.6 Notification service
There are two possible variants when configuring notifications. Either without server-side SMTP authentication or with server-side SMTP authentication.
The following events trigger notification:
-
Update available
-
Update has been installed
4.5 SSL
To enable end users' browsers to log on to the AGW automatically, an SSL certificate is required that is trusted by these browsers. We recommend creating an appropriate certificate with an internal CA or obtaining one from a known CA.
Alternatively, a „self-signed certificate" can be generated via the AGW, which can then be issued to the end user's browser.
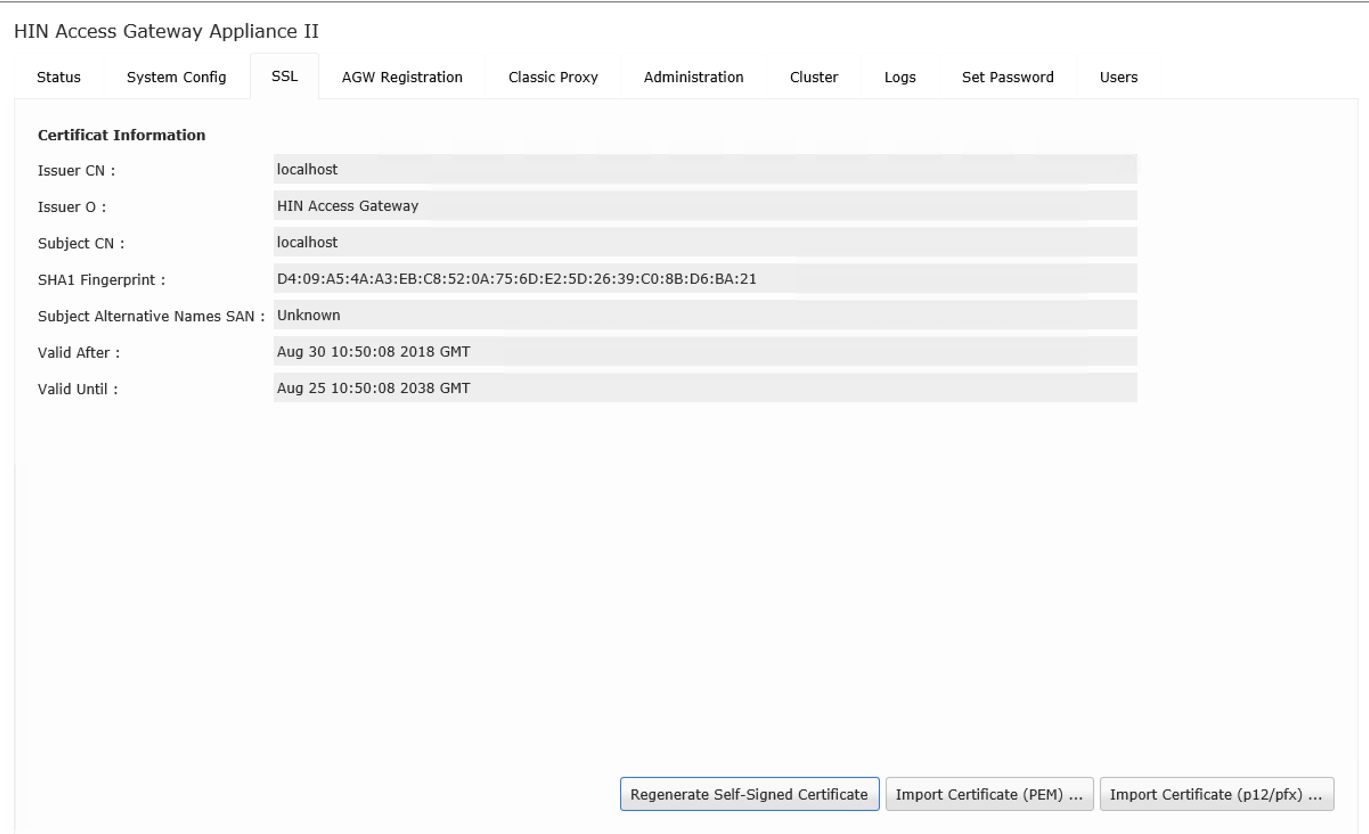
Figure 8: Display of the stored certificate
Connecting to the active directory
5.1 LDAPS
The AGW can connect to the AD using LDAPS. Enter the domain controller under «Sys Config». You can use the name or the IP. -- The DC fingerprint is generated after a few minutes by the AGW itself.
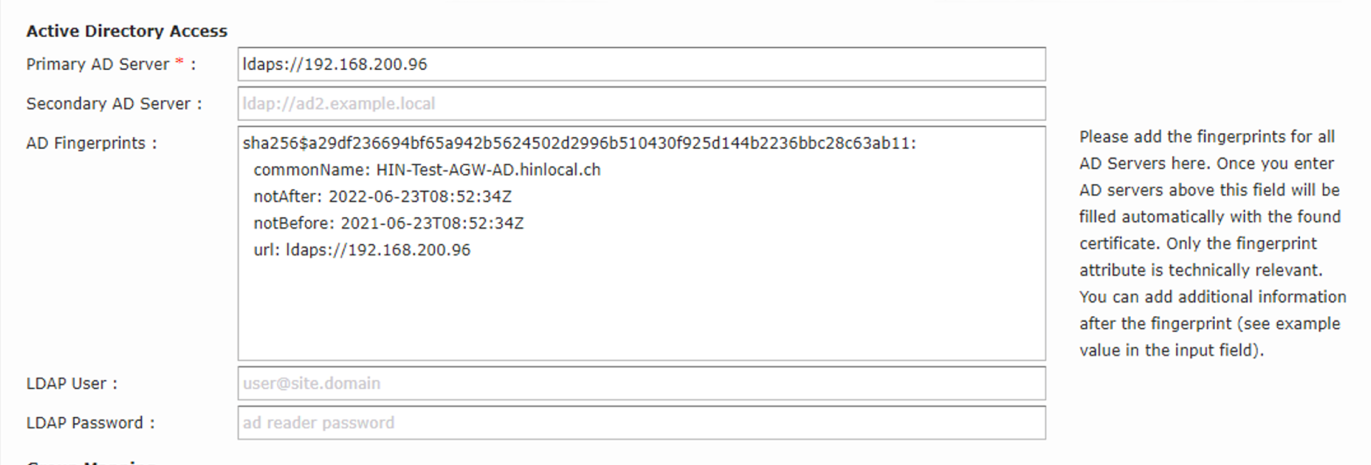
Figrue 11: LDAPS and AD fingerprint
5.2 Method
The authentication type can be selected under «Method». NTLM or Kerberos. --- We recommend using Kerberos where possible. Kerberos is required if you have enabled the Chanel Binding option on your Active Directory.

Figure 12: Authentication method
5.3 Kerberos
To ensure that the AGW can communicate via Kerberos, it has to connect to the AD. To do this, the DC needs to be entered as the DNS under «Sys Config».
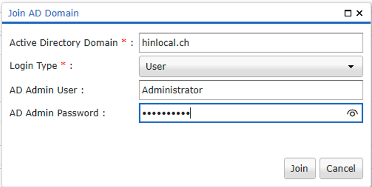
Figure 13: Join AD Domain
Once the AGW is connected, you can view it in the AD under «Computer». Please do not move the AGW. Simply activate the Kerberos delegation in the AGW's properties.
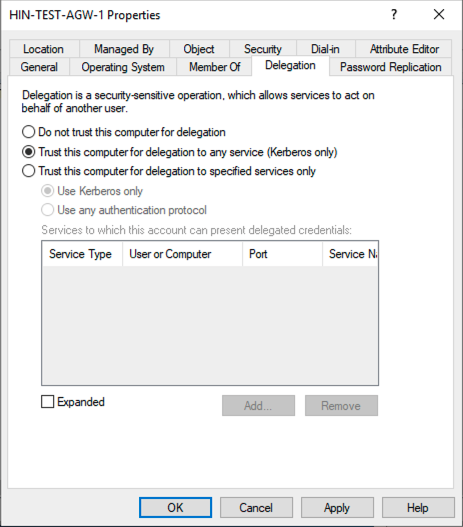
Figure 14: Activation of the delegation
An LDAP read only user is required to read out the OU attribute and AD group once the user has been successfully authenticated with the Kerberos ticket.

Figure 15: LDAP read only user
5.4 AGW Registration
AGW Registration is where relevant information for activating the AGW is stored. The information stored here is transmitted to HIN, checked and put into productive operation within the framework of activation.
| Tab | Description |
|---|---|
| AGW Auth Service | |
| Organisation name | The name of the institution for which the appliance is registered. |
| Auth Service URL | The internal address of the AGW via which it can be accessed from the user's network. Important: The stored SSL certificate must correspond to the selected URL. |
| Comma separated list of externals subnets | Here, external IP addresses or ranges are defined that can be seen by HIN when access is made from your organisation. HIN uses the IP address to identify the organisation and issue an authentication request to the correct AGW. |
| AGW Admin Contact | |
| Admin Name | The administrator who can be contacted if AGW problems arise. If you do not wish to name a specific administrator, you can also enter the name of a department or a similar contact. |
| Admin eMail Contact | The e-mail address for the contact person. This may also include a group address. |
| Admin Phone Contact | The telephone number of the contact person. |
 Figure 9: Registration of the AGW appliance
5.5 Classic Proxy
Classic Proxy provided proxy functionality for AGW 1.5 to ensure backward compatibility. Applications that still use the proxy functionality should be promptly converted to oAuth. Please contact the relevant provider.
5.6 Administration
The following settings can be made and functions executed on the Administration tab.
5.6.1 Online backup
Backup saves all the access gateway settings, including configured users. Once the online backup has been configured, a backup is saved to the approved drive whenever the settings for the access gateway are changed.
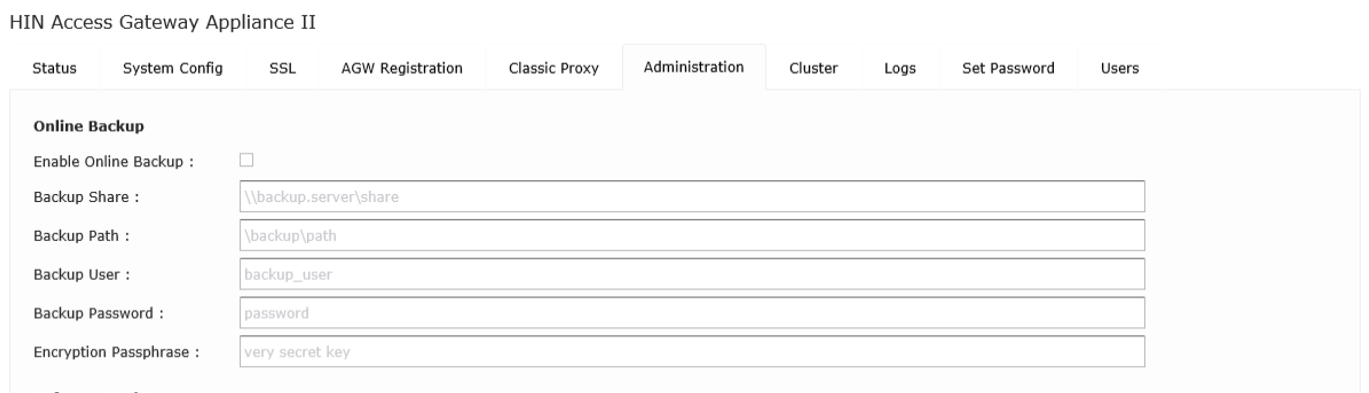
Figure 10: Configuration of online backup
To conduct a manual backup, click on the Download Backup button from the functions at the bottom of the screen. You will then be asked to enter a passphrase to encrypt the backup.
Please note that this passphrase is required to restore the
backup.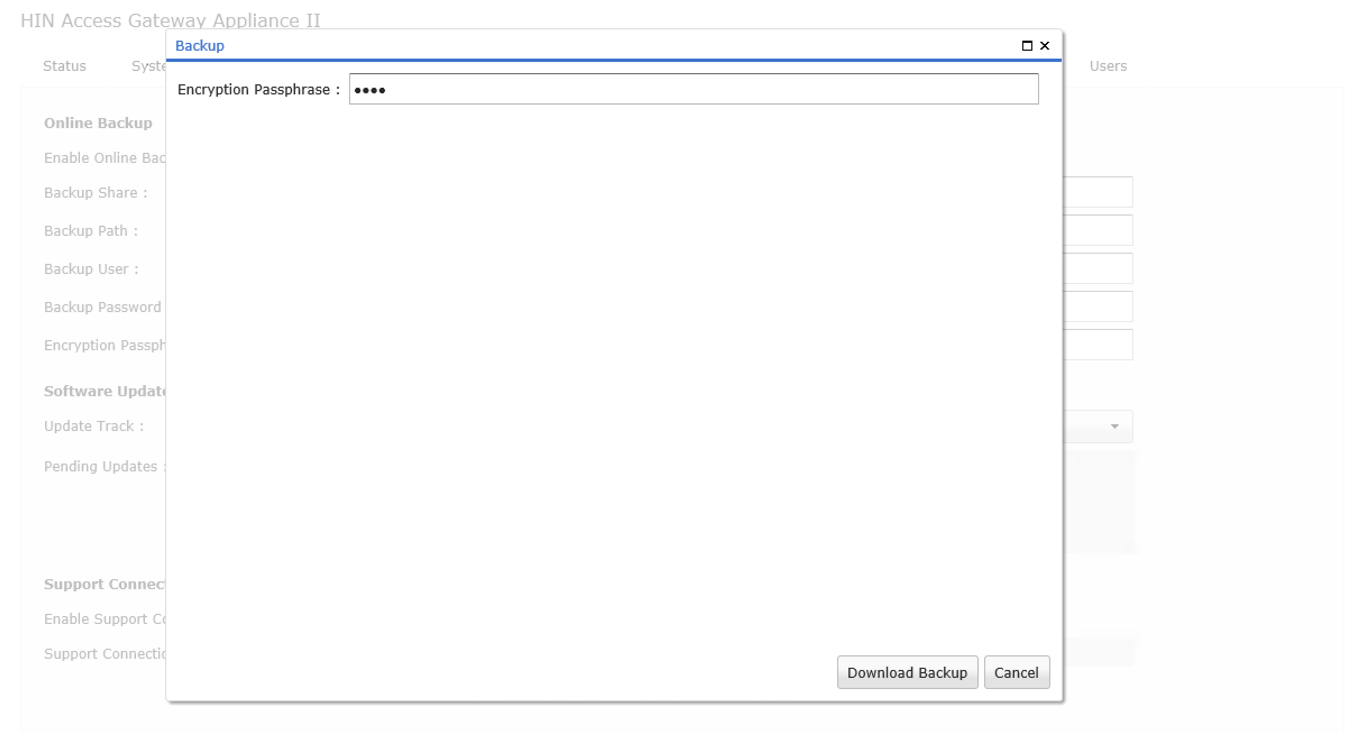
Figure 11: After clicking on Backup, you must enter a passphrase
5.6.2 Software updates
Updates for the access gateway can be downloaded and installed under «Software Update». We recommend taking a snapshot before starting the update and restarting the VM after the update. You can then use https://dir.hin.ch to check if the HIN subscriber directory can be called up.
 Figure 12: Overview of software updates pending installation
Update Track
Two update tracks are available.
Stable Only updates that have been tested and approved by HIN are downloaded and installed.
Testing Updates that are approved for test purposes are downloaded and installed. They should not be used for productive environments.
As soon as a new update is available for the selected update track, e-mail notification is sent to the notification address (see 4.4.6) specified for the e-mail recipient. Available updates are shown in the Pending Updates field. The access gateway independently checks whether new updates are available. The Check for Updates button can be used to initiate this check manually. Available updates can be installed by clicking the Software Update button.
5.6.3 Support Connection
The support connection creates an SSH tunnel to the HIN support server. HIN support can use this tunnel to connect to the access gateway. To establish a support connection, you need to activate the Enable Support Connection checkbox and then click on the Save Settings button. A remote support ID then appears in the Support Connection Status field.
HIN Support can use this ID for remote maintenance.

Figure 13: Active support connection
5.6.4 Buttons
Save Settings Saves the selected settings
Check for Update Checks whether new updates are available for the selected update track. (NB: If you change the track, you must first save the configuration)
Download Backup Enables the backup file to be downloaded (see 4.8.1)
Restore Backup The Restore Backup button can be used to restore an access gateway from a backup file. The passphrase for the backup file must be entered before the backup can be restored.
Factory Reset Resets the access gateway to the factory settings. All configuration is thus permanently lost.
Software Update Starts installation of the available software updates (see 4.8.2)
Shutdown Shuts down the access gateway.
Reboot Reboots the access gateway.
5.7 Clusters
The access gateway can be configured as a cluster for redundant operation. To do this, the initial access gateway must be configured fully. The second access gateway need only be configured up to section 4.2.2: „Changing the initial password."
5.7.1 Activating clusters
To activate the cluster, activate the Enable Clustering checkbox and enter a floating IP. The cluster can then be accessed via this virtual IP address. The cluster IP must be in the same subnetwork as the access gateway. The cluster is activated by clicking on the Save Cluster Config button.
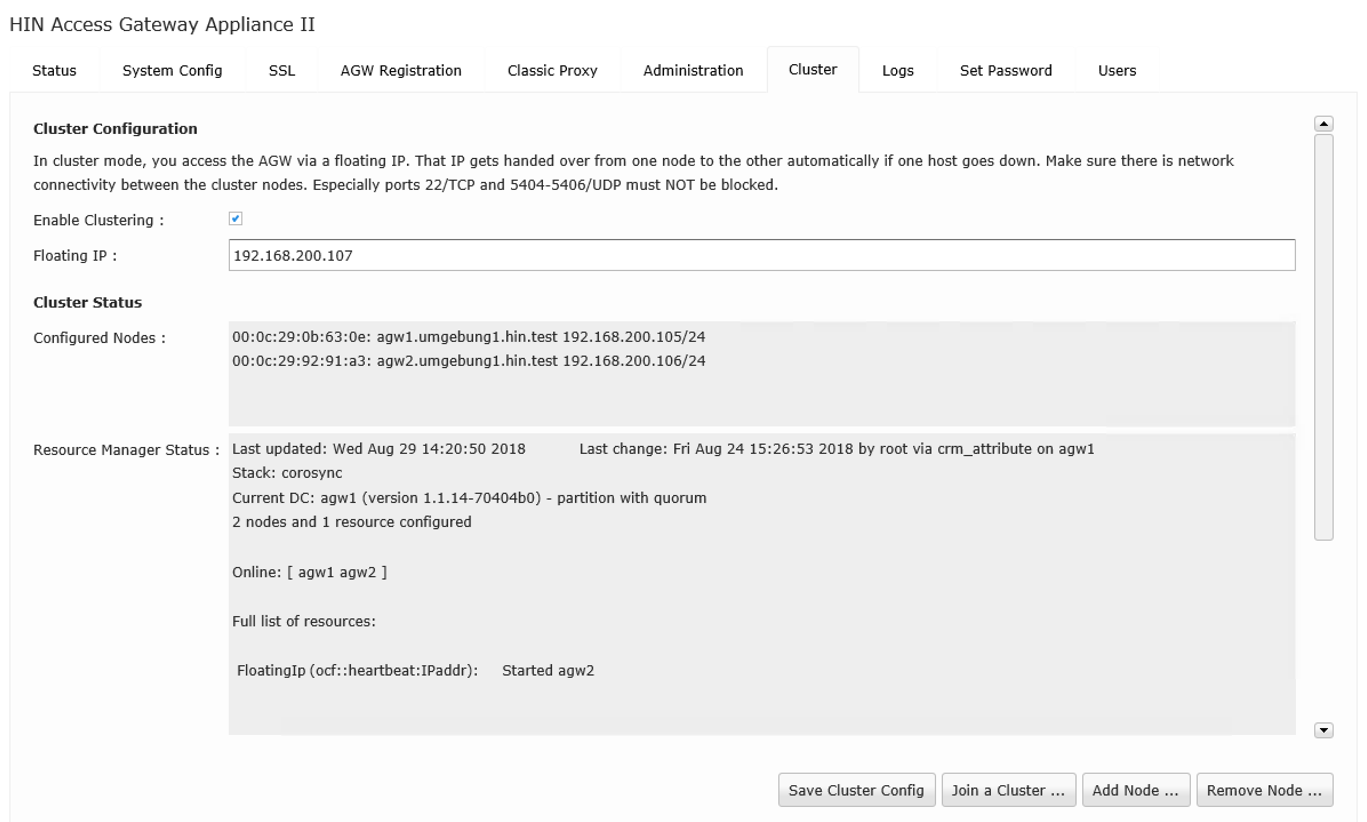
Figure 14: Overview page for an active cluster
The cluster can now be accessed via the following address: https://[floating IP]:4433https://[floating IP]:4433. The cluster currently only consists of a single node.
5.7.2 Adding nodes
To add a node to the cluster, you must first prepare the new node. To do this, you need to import the master public key of the existing cluster node into the new node.
Master Node
The master public key of the master node must be copied.
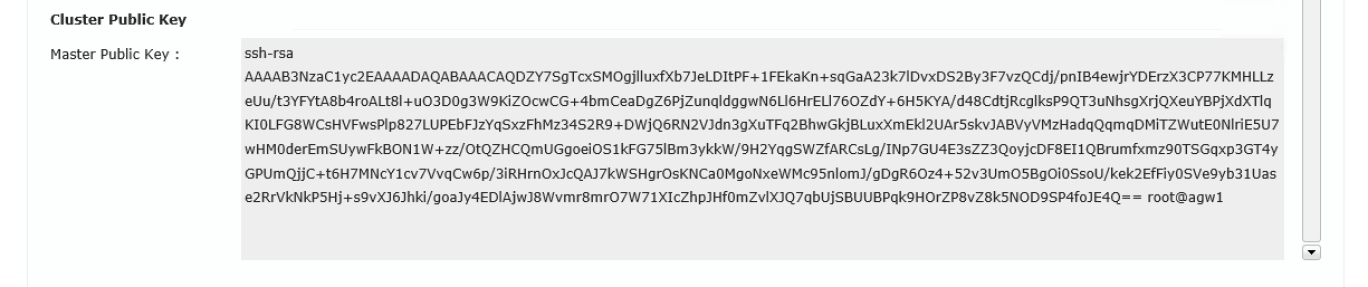
Figure 15: The master public key of the master node must be copied
Slave Node
On the cluster node, the «Join a Cluster» function must be opened and the previously copied master public key inserted.
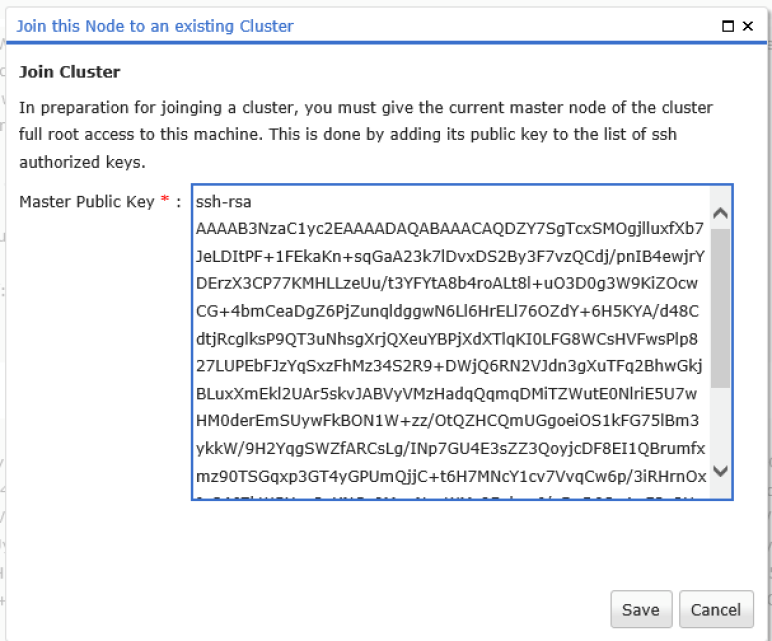
Figure 16: The public key of the master device must be imported into the
slave
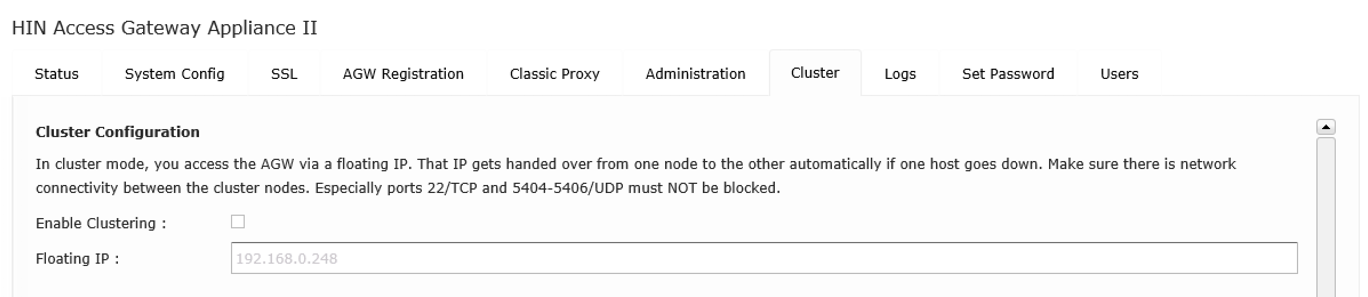
Figure 17: The cluster option remains disabled on the slave node
Master Node
Back on the master node, the slave must now be added to the cluster using Add Node. To do this, enter the IP address.
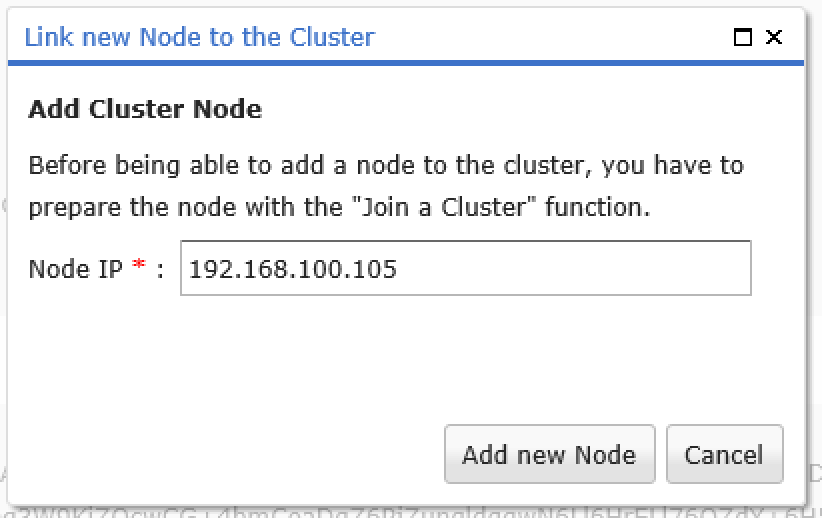
Figure 18: On the master node, the slave node must now be added to the
cluster using the IP
Specify a node IP for the slave node on the master node and click the Add New Node button.
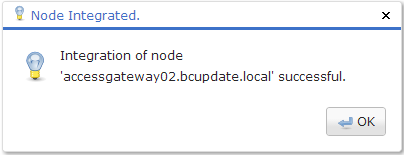
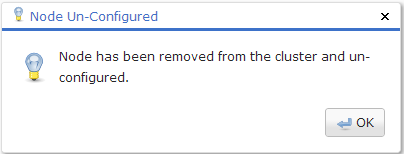
Figure 19: Confirmation after successful addition of the node
Confirm the message by clicking on OK.
Figure 20: Cluster overview with two devices (online: agw1 agw2)
The cluster status now shows which nodes are configured in the cluster, which are online or offline and which node has the master role.
5.7.3 Removing nodes
The Remove Node option can be used to remove from the cluster all nodes that do not currently have the master role.
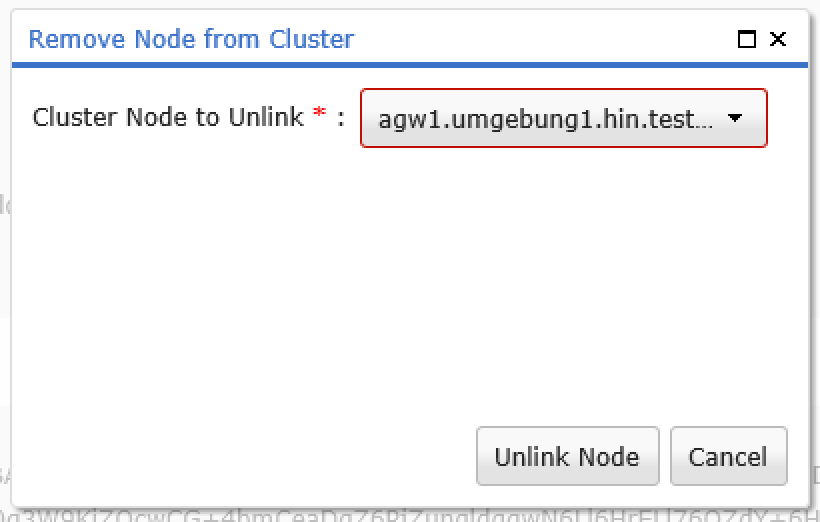
Figure 21: The required device can be selected from the dropdown list
The node is then reset to the factory settings.
5.8 Logs
On the Logs tab, various system logs can be analysed, sorted and downloaded by clicking on the Download Logfile button.

Figure 22: Log overview
The following log files are available
Linux Messages File Access to the Linux messages file.
Linux Syslog Access to the Linux syslog file. This includes information on authentication and notification dispatch.
5.9 Users
The User tab can be used to create new users and edit or delete existing users.
Browser configuration
The AGW uses NTLM to identify active directory users. Depending on the browser used, the configuration may require modification.
6.1 Internet Explorer
Internet Explorer enables configuration of the various security attributes for the Intranet, trusted sites and Internet zones. For the AGW to function, the browser must log on automatically. The option can be found as follows:
Internet Options -> Security -> Custom Level... (e.g. for the Intranet zone) -> Automatic Log-on
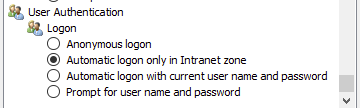
Figure 23: Automatic login on Internet Explorer
In general, only «Automatic log-on only in the Intranet zone» is
activated. We therefore recommend adding the AGW to this zone:
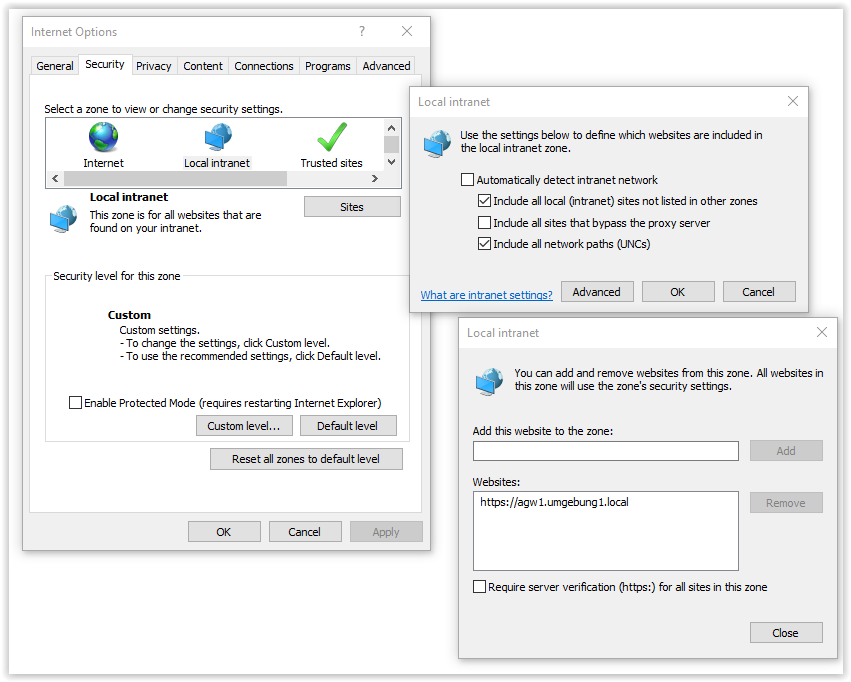
Figure 24: The AGW appliance can be added to the Intranet zone via Sites
The settings must now be distributed via the GPOs.
6.3 Firefox
On Firefox, automatic login is disabled by default. To activate it (version 60.0.1), proceed as follows:
In the address line, enter «about:config» and confirm the subsequent security warning:
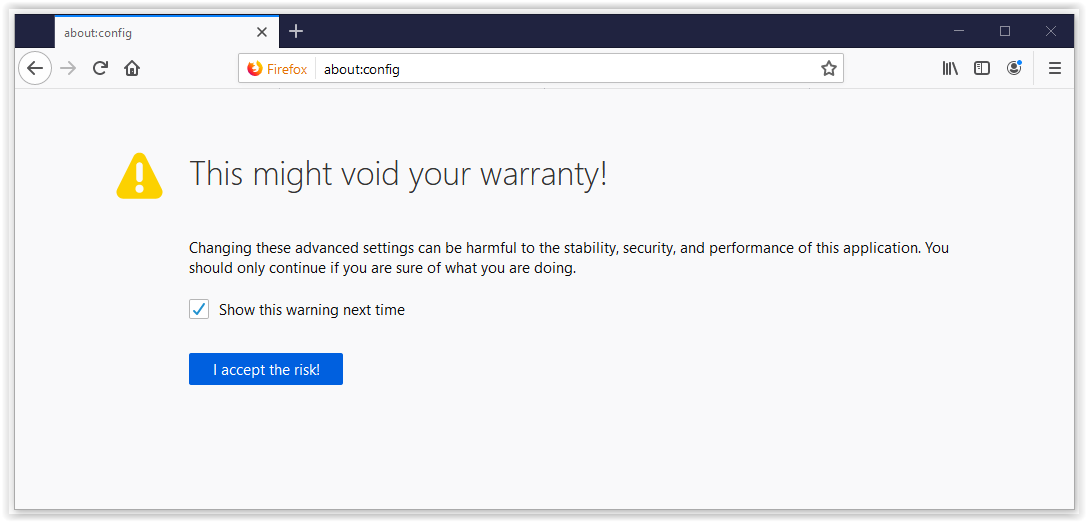
Figure 25: On Firefox, configuration can be made under about:config
In the settings, search for «network.automatic-ntlm-auth.trusted-uris»
and add the URL of your AGW. Kerberos additionally requires
«network.negotiate-auth.delegation-uris».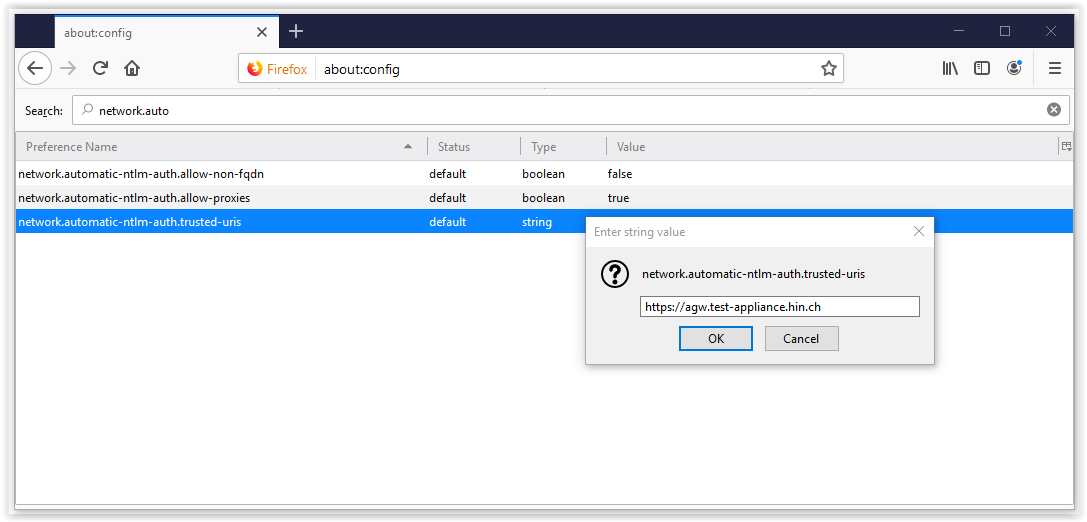
Figure 26: Search for the value «network.automatic-ntlm-auth.trusted-uris»
6.3 Chrome
Chrome uses the security settings for Internet Explorer. If you use separate policies for Chrome and Edge, the browser can be started manually with the following command to test the login process:
For NTLM:
Chrome:
"C:\Program Files (x86)\Google\Chrome\Application\Chrome.exe" -auth-server-whitelist="AGW.DOMAIN.COM" -auth-negotiate-delegatewhitelist="AGW.DOMAIN.COM" -authschemes="digest,ntlm,negotiate"
Edge:
"C:\Program Files (x86)\Microsoft\Edge\Application\msedge.exe" -auth-server-whitelist="AGW.DOMAIN.COM" -auth-negotiate-delegatewhitelist="AGW.DOMAIN.COM" -authschemes="digest,ntlm,negotiate"
For Kerberos:
Chrome:
"C:\Program Files (x86)\Google\Chrome\Application\Chrome.exe" -auth-server-whitelist="AGW.DOMAIN.COM" -auth-negotiate-delegatewhitelist="AGW.DOMAIN.COM" -authschemes="digest,negotiate"
Edge:
"C:\Program Files (x86)\Microsoft\Edge\Application\msedge.exe" -auth-server-whitelist="AGW.DOMAIN.COM" -auth-negotiate-delegatewhitelist="AGW.DOMAIN.COM" -authschemes="digest,negotiate"
The settings can be distributed via the GPOs.
Testing
7.1 Access to HIN-protected sites
Access to a HIN-protected application can be tested by calling up the following page: http://dir.hin.ch.
This must take you to the protected HIN subscriber directory:

Figure 48: HIN directory
You can see which HIN ID you are currently logged in with in the top right of the screen. If the user has a personal ID, they can map it by calling up apps.hin.ch and entering their HIN login and the second authentication factor (e.g. SMS code). The
user can see the mapping at https://apps.hin.ch/#app=HinIdMapMgr. The end user can also select the second factor for authentication here.
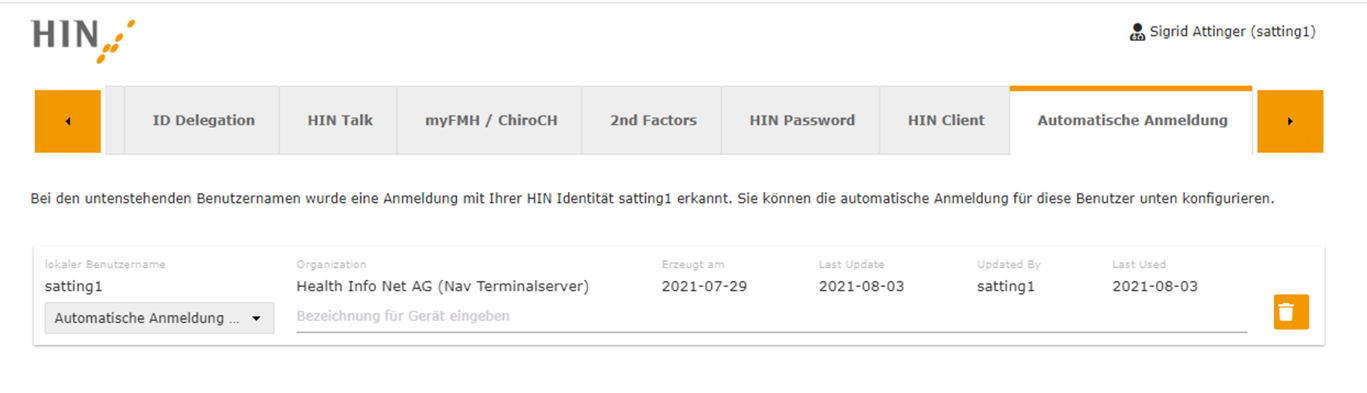
Figure 49: apps.hin.ch
7.2 Internet access
Access to a page on the Intranet should also be tested.
Frequently asked questions
| Question | Category | Answer |
|---|---|---|
| Access to some applications is direct, rather than via our Internet proxy. How can these exceptions be configured on the HIN access gateway? | Proxy | Enter exceptions under PAC Server → Proxy Exceptions. If the application has to be opened completely without a proxy, the exception can be entered under "PAC Server → Always Direct". |
| The OU names in the active directory include blank spaces. How can the LDAP path be specified in the configuration? | General | Special characters in the LDAP path that are not "URL-safe" (e.g. blank spaces) must be escaped as described in http://tools.ietf.org/html/rfc2255. Blank spaces must therefore be replaced with "%20". Exemple : PythonOption PDC ldap:///192.168.0.49/DC=dig%20this,DC=i%20can%20add%20spaces,DC=net |
| The browsers continue to use the old PAC, even though the institution's PAC file has been modified. Where does the problem lie? | Proxy | The HIN access gateway caches the organisation's PAC file for four hours. The institution's PAC file is only re-evaluated after this time. You can delete the PAC file by clicking on the Clear Proxy Cfg Cache button on the PAC Server tab. The browser can also buffer the PAC file. To ensure that the browser uses the latest PAC file, temporary Internet files must be deleted. |